Welcome to our guide for how to create an ERC-1155 NFT edition collection with Launchpad!
This will be a complete, step-by-step walkthrough. In it, we’ll cover the process of making a collection, while also showcasing some of the advanced options you can make along the way. While you’re welcome to follow this article from beginning to end, keep in mind that the exact requirements for making a collection can vary from person to person. If something doesn’t appear relevant to your case, feel free to skip ahead!
(If you’d rather make an ERC-721A collection, please read our article, “How to Create an ERC-721A NFT Collection With Launchpad” instead).
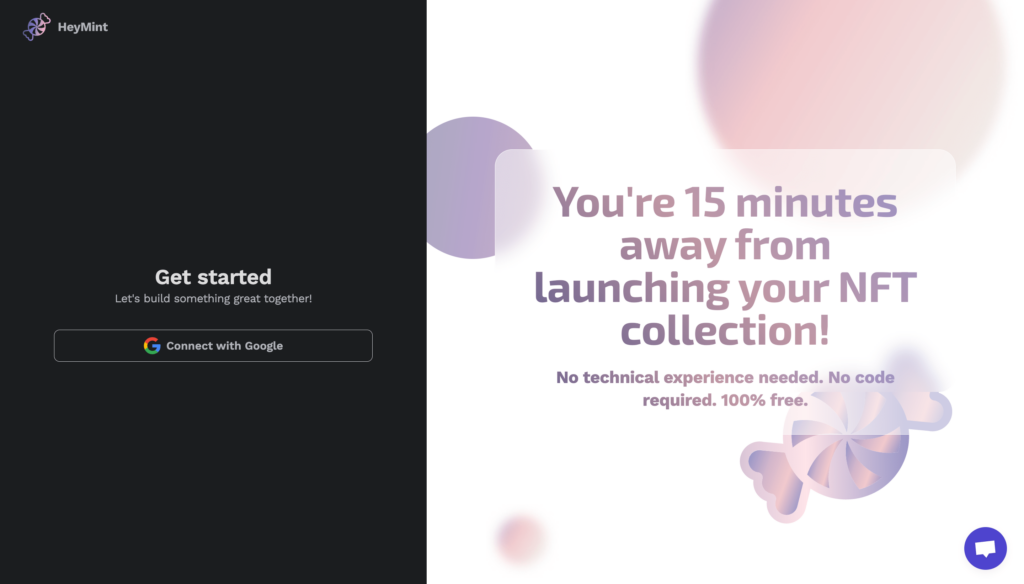
1. From the HeyMint Launchpad homepage, select “Connect with Google”
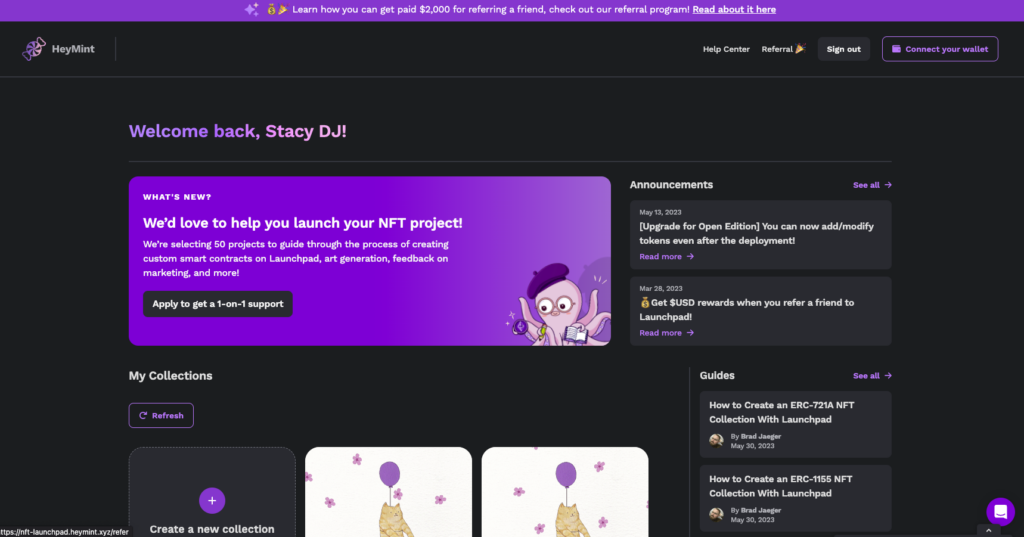
2. Select the “Connect your wallet” button in the top right-hand corner of the screen
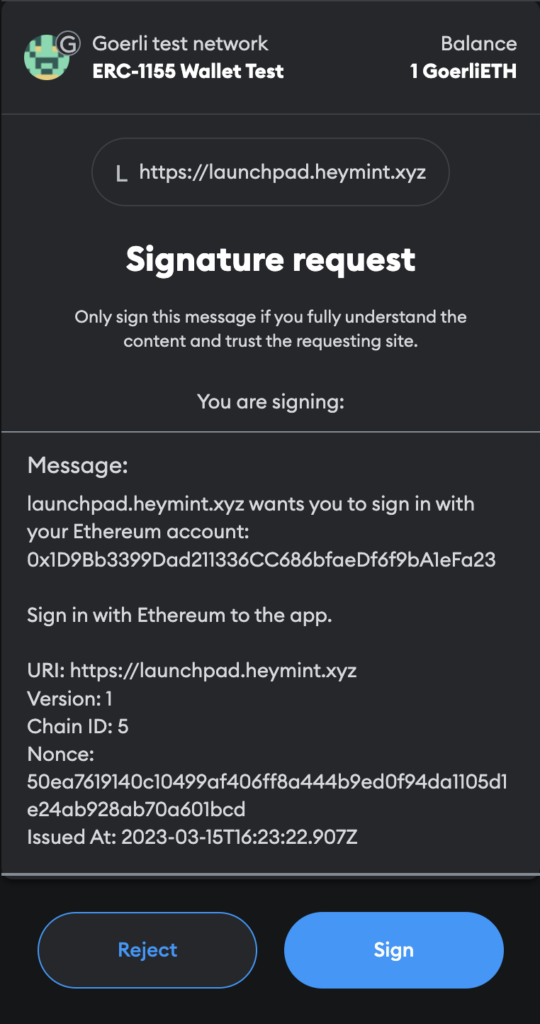
3. Sign the signature request pop-up that appears
(this is used for identification purposes only; you will not be charged).
After signing, you will see your wallet connected in the upper right-hand corner of the screen.

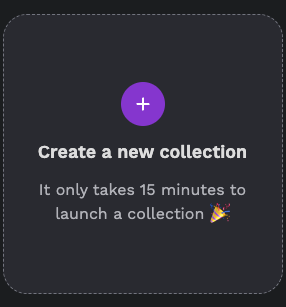
Now that your wallet is connected, let’s start creating a collection! Click on “Create a new collection”.
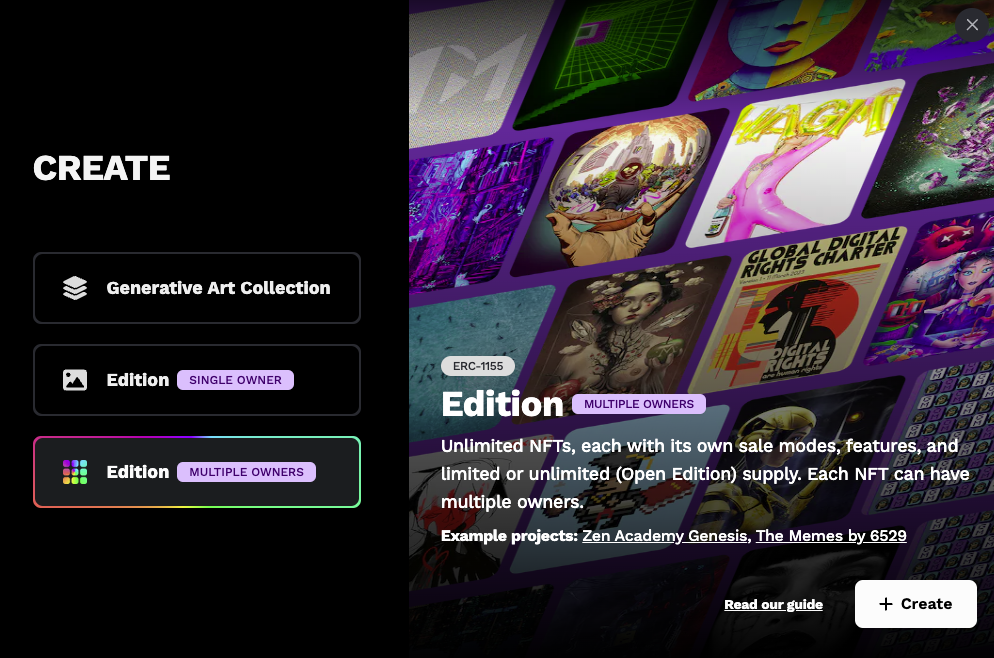
4. Select Edition (Multiple Owners) and click “Create”
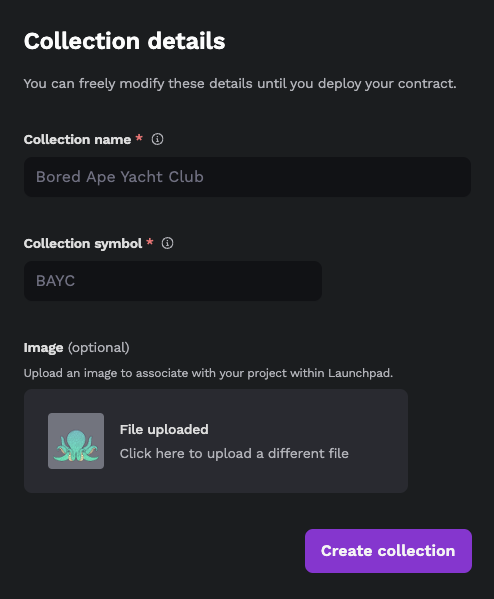
5. Fill in some basic collection details about your project:
Collection name: the official name of your NFT collection that will appear on NFT marketplaces and Etherscan. This cannot be changed after deploying your smart contract.
Collection symbol: a short symbol, typically in all caps and 3-5 characters in length, that serves as an abbreviation for the name of your NFT collection (Example: BAYC for Bored Ape Yacht Club). This will show up on token trackers such as Etherscan and also cannot be changed after deploying your smart contract.
Image: this is an (optional) image you can use to associate with your project within Launchpad. We accept: gif, .png, .jpeg, or .jpg.
Before we jump into creating your token, a quick word about limited and open editions.
A Note About Open Editions and Limited Editions
For the purpose of this walkthrough, this is what we mean when we say “open edition” or “limited edition” NFTs.
Open edition: has no token supply cap, but does have a time limit/end time.
Limited edition: has a token supply cap, and (generally) a time limit/end time.
If you wish to make a limited edition with Launchpad, all you need to do when creating your token is set a max supply on the token details page and (generally) set an end time on the sales details page.
To release it as an open edition instead, keep the end time on the sales detail page, but do not set a max supply on the token detail page.
Okay…moving on! You’re ready to create your token(s)!
6. Create Your Token(s)
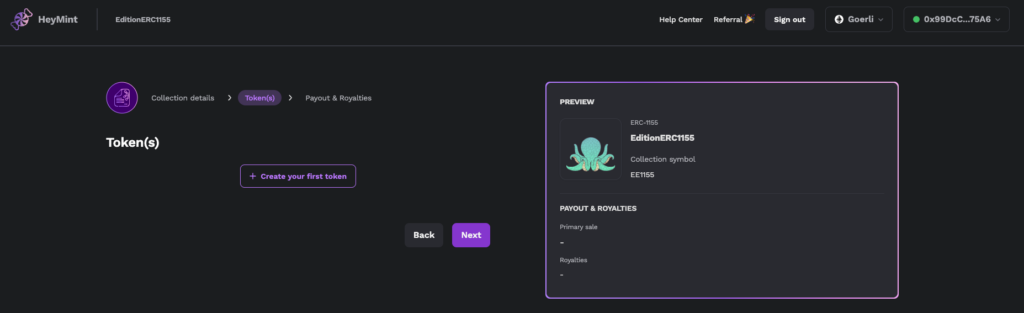
Select “+ Create your first token”. A page will pop-up featuring three categories: token details, artwork, and sale details.
From the 1st page, Token Details, fill out a bit of info:
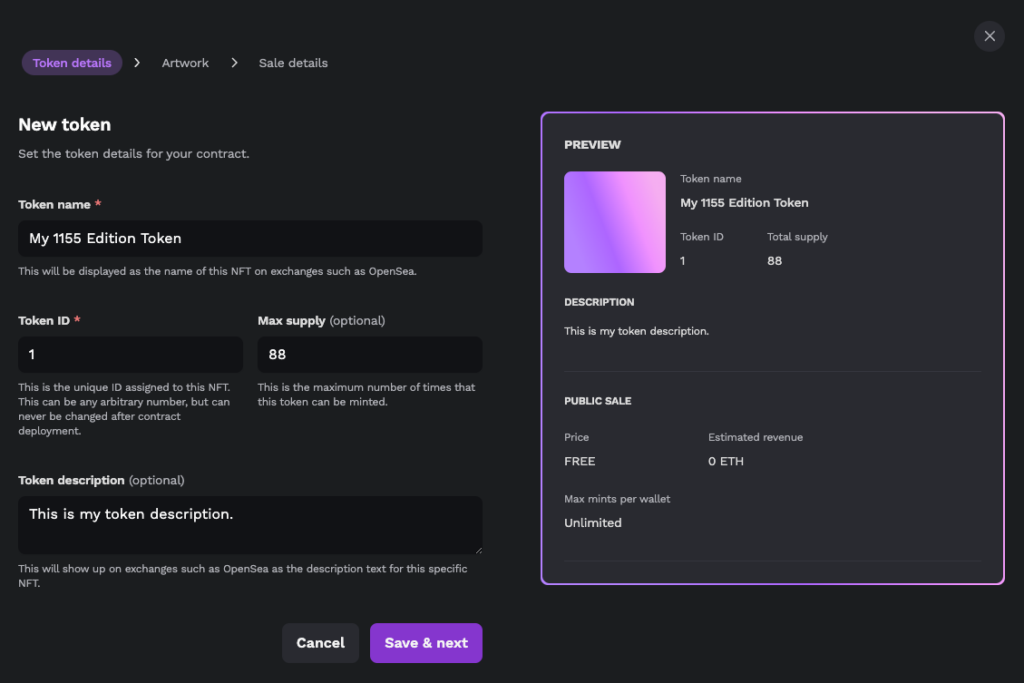
Token name: will be displayed as the name of this NFT on exchanges such as OpenSea.
Token ID: this is the unique ID assigned to this NFT. This can be any arbitrary number, but can never be changed after contract deployment.
Max supply: this is the (optional) maximum number of times that this token can be minted.
Token description: A (optional) description will show up on exchanges such as OpenSea as the description text for this specific NFT.
As you fill in your collection details, you will see a preview appear on the right-hand corner of your screen.
When you’re ready, press the “Save & next button” to move onto artwork.
(Note: if your goal is to make an open edition, do not set a max supply. If your goal is to make a limited edition, make sure to set a max supply on this page (and generally) an end time for the mint on the sales detail page.)
From the 2nd page, Artwork, let’s upload the art for your token and set any optional attributes.
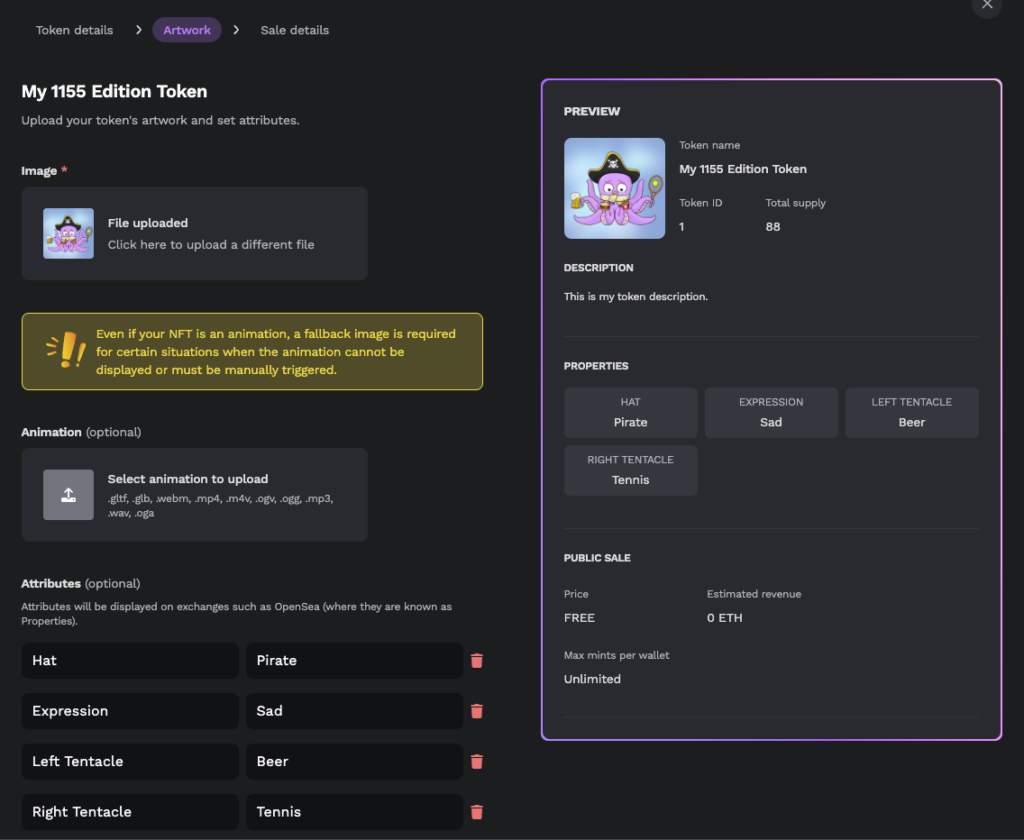
You can choose either an image or animation for your token:
Image: we support .gif, .png, .jpeg, .jpg
Animation: we support .gltf, .glb, .webm, .mp4, .m4v, .ogv, .ogg, .mp3, .wav, .oga
(Note: even if your NFT is an animation, a fallback image is required for certain situations when the animation cannot be displayed or must be manually triggered.)
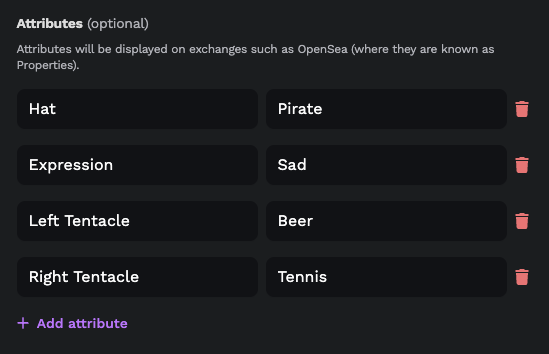
There’s also an optional ability to add attributes to your token (on OpenSea these are called “properties”). If this is something you’d like to add to your token, click “+ add attribute”. If you do this, you will need to specify both a trait type (i.e. Color) and trait value (i.e. Blue) for your attribute.
Alternate Path: Metadata Already Uploaded Elsewhere
If you already have your metadata uploaded somewhere yourself, you can manually override the token URI instead. From that Artwork page, simply click “Advanced options” and hit the toggle that says “Override token URI”.
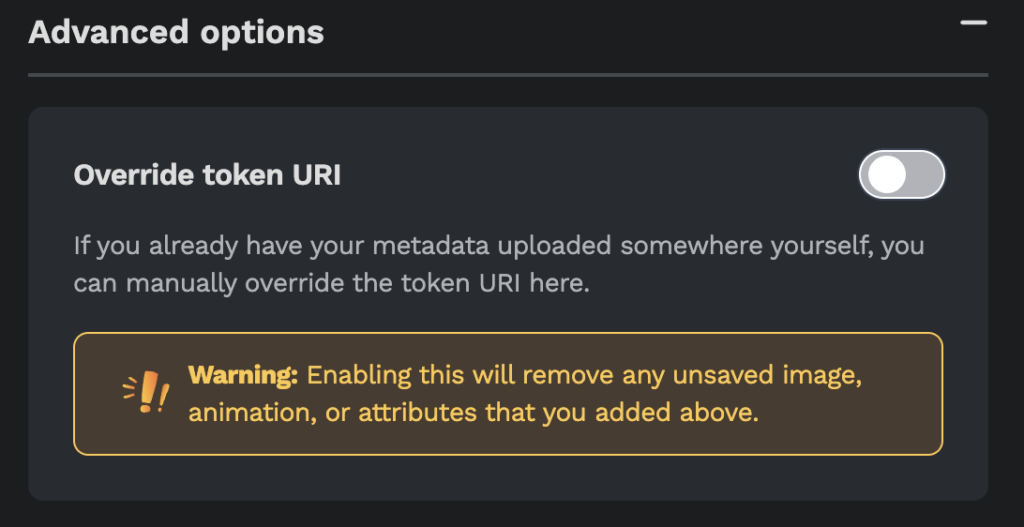
Doing so will switch the page and you’ll be presented with the override token URI. In this case, you can point towards your metadata stored elsewhere, like IPFS.
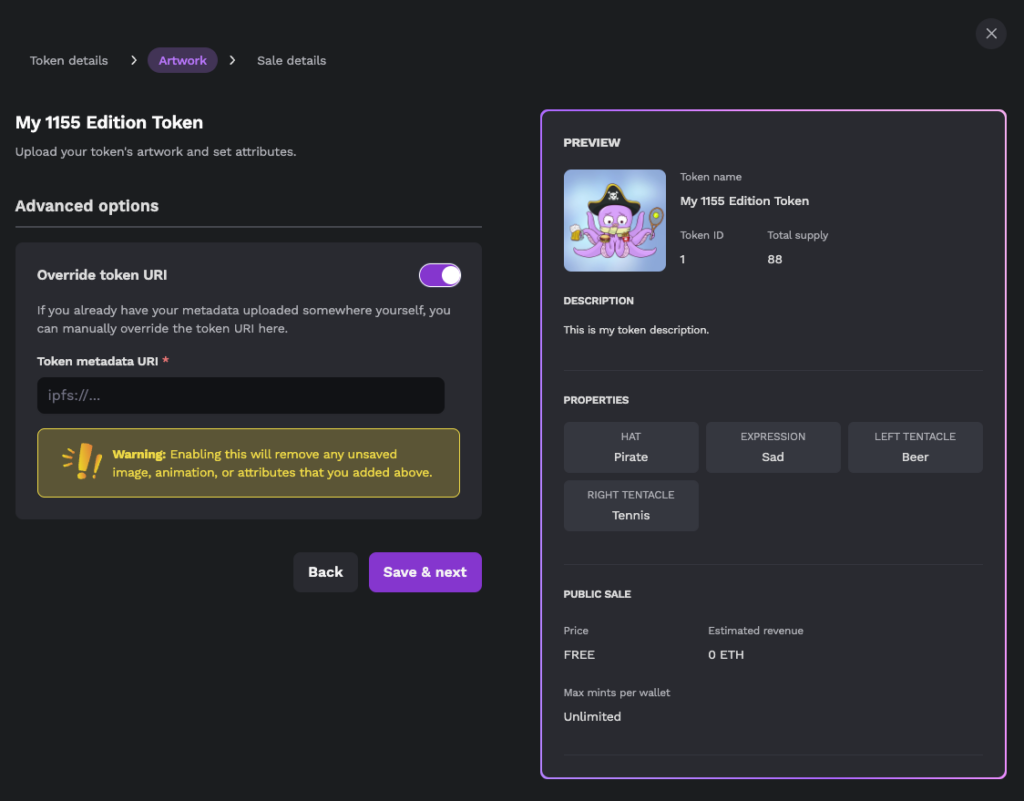
Regardless of which route you took (uploading through Launchpad, or overriding your token URI) click “Save & next” when you’re all set.
From the 3rd page, Sale details, you’re met with:
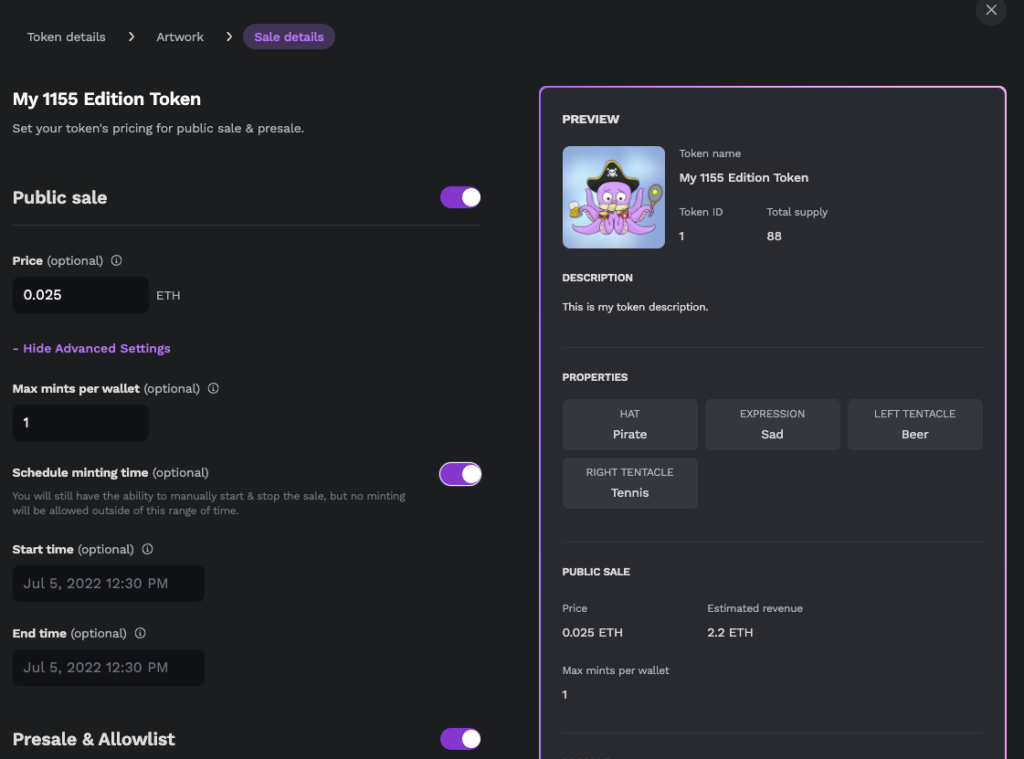
Public sale: Enabled by default, this is the price collectors pay to mint each NFT in the public sale. If you leave the price blank, it will be a free mint. This number can be changed or adjusted, even after you deploy your smart contract.
(Note: a fee of (0.0007 ETH/~$1) is applied to collectors for each token minted on Ethereum, with limited exceptions. Read more about how our fee works here.)
If you click + Advanced Settings under Price, you will also see:
Max mints per wallet: this is (an optional) maximum number of NFTs that can ever be minted by a single address across multiple transactions. This number can be changed even after you deploy your smart contract. If you leave this blank, the max mints per wallet will be unlimited.
Schedule minting time: an (optional) ability to set a start and end time for your mint. You will still have the ability to manually start & stop the sale, but no minting will be allowed outside of this range of time.
(Reminder: if your goal was to make a limited edition, make sure that you set a max supply on the token details page, (and generally) an end time for the mint on this sales detail page.)
There is also a Presale & Allowlist toggle that is disabled by default. If you enable it, the following categories appear:
Set presale mint price: this optional setting is the price collectors on your allowlist will pay to mint each NFT in your presale. This number can be changed at any time, even after you deploy your smart contract.
Presale supply: this optional setting lets you limit presale mints. You may enter the number of total NFTs available for minting during presale. Once mints reach this limit, the presale will automatically turn off and all remaining NFTs can only be minted in the public sale.
If you click + Advanced Settings under Presale supply, you will also see:
Max mints per wallet: this is (an optional) maximum number of NFTs that can ever be minted by a single address across multiple transactions. This number can be changed even after you deploy your smart contract. If you leave this blank, the max mints per wallet will be unlimited.
Schedule minting time: an (optional) ability to set a start and end time for your mint. You will still have the ability to manually start & stop the sale, but no minting will be allowed outside of this range of time.
When happy with your settings, click the “Save” button.
(Note: you won’t be able to enable a presale after deploying your contract. If you plan to have a presale, be sure to set it up before deployment. Setting a presale after deployment is not possible, and would require a redeployment of your contract.)
You may then repeat the process as many times as you like if you wish to add additional tokens, or select the “Next” button to move onto Payout & Royalties
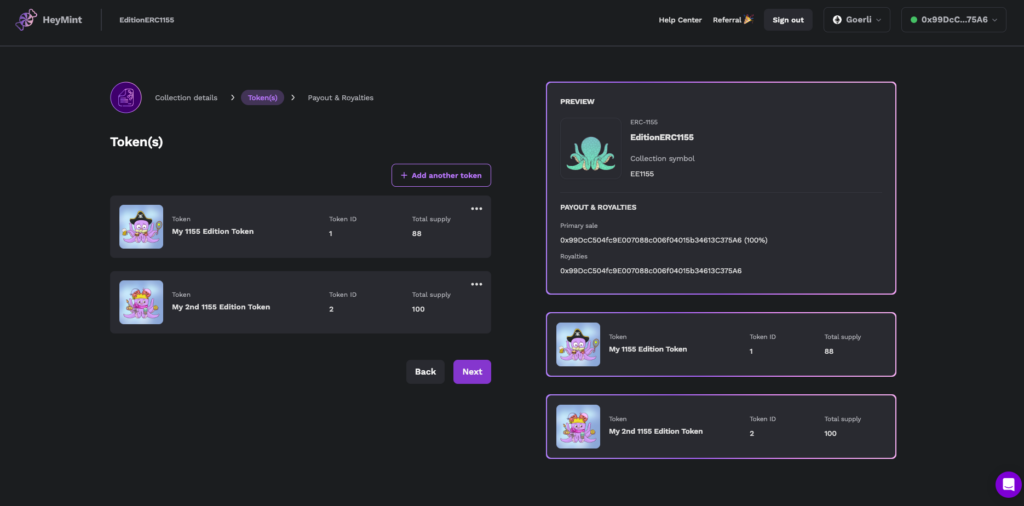
When you’re all set, click the “Next” button to continue.
7. Configure Payout & Royalties
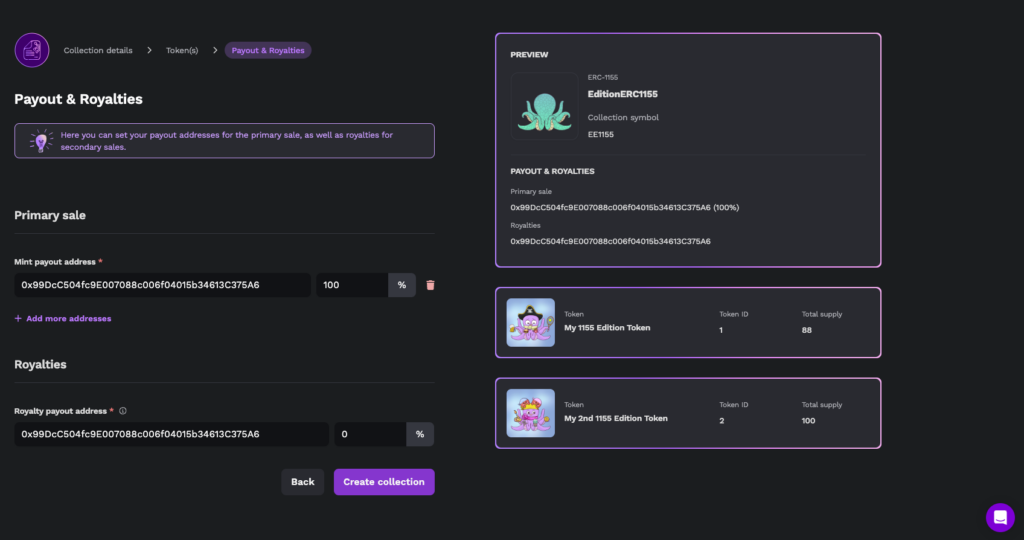
From this screen you may set your mint payout wallet address, where all of your primary revenue will be deposited. Should you wish, you can also add additional wallet addresses, and establish any percentage split between them.
You may also designate the same (or a different) wallet for your royalties, which are a percentage of your secondary sales.
With the settings to your liking, click the “Create collection” button.
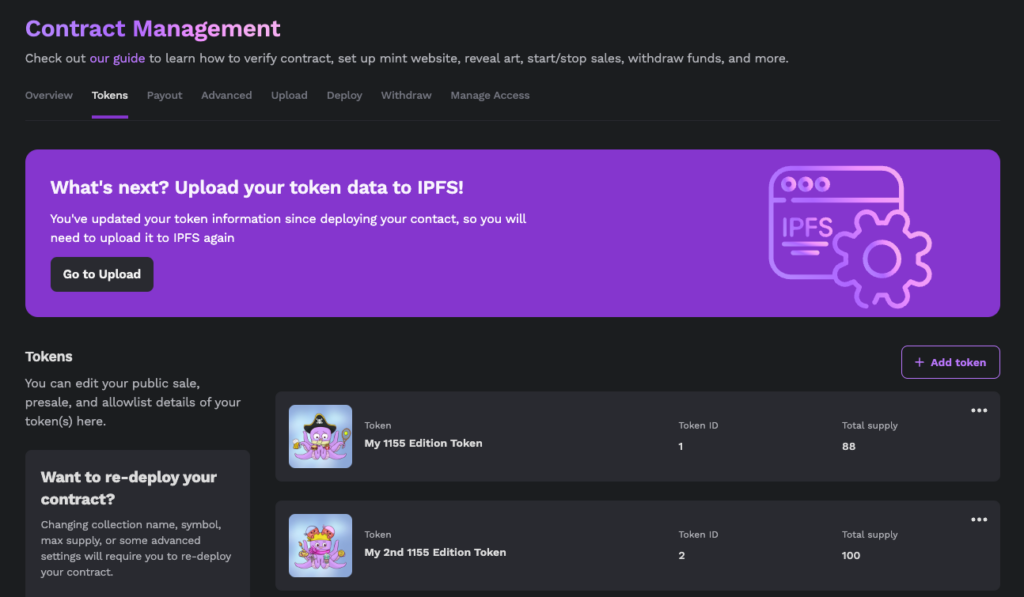
At this point in the process, you will be at the Contract Management Dashboard
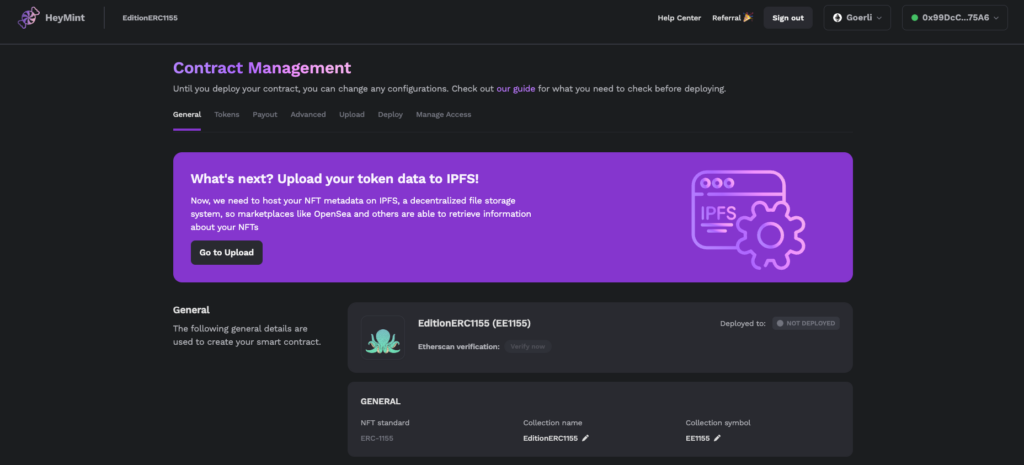
From here, you can easily jump between the General, Tokens, Payout, Upload, and Deploy pages. Most of the settings on these pages will have been pre-configured already based on your previous input, but we will touch on some additional features they offer, in a bit.
But first, a quick note about royalty enforcement…
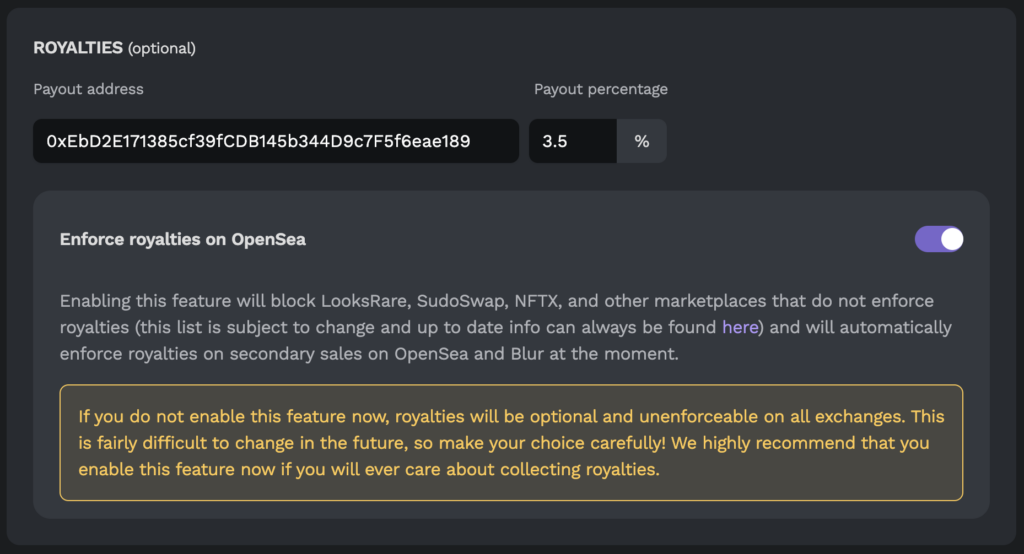
8. Decide On If/How You’re Enforcing Royalties
The payouts page also has a section where you can (optionally) enforce royalties on OpenSea. Enabling this feature will block LooksRare, SudoSwap, NFTX, and other marketplaces that do not enforce royalties (the blocklist can and does change quite frequently: for the most up to date info, you can check this list here), and will automatically enforce royalties on secondary sales on OpenSea and Blur at the moment.
If you do not enable this setting at the start, royalties will be optional and unenforceable on all exchanges. This is fairly difficult to change in the future, so make your choice carefully! We highly recommend that you enable this setting if you care about ever collecting royalties.
With that decision behind us, let’s get started with the next major part of the process, which is uploading your token data to IPFS, a decentralized file storage system, so marketplaces like OpenSea and others are able to retrieve information about your NFTs.
Depending where you are at this stage, you may select the “Go to Upload” button from the banner at the top of the page if it’s there, or click the “Upload” button on the Contract Management Dashboard.
9. Upload to IPFS
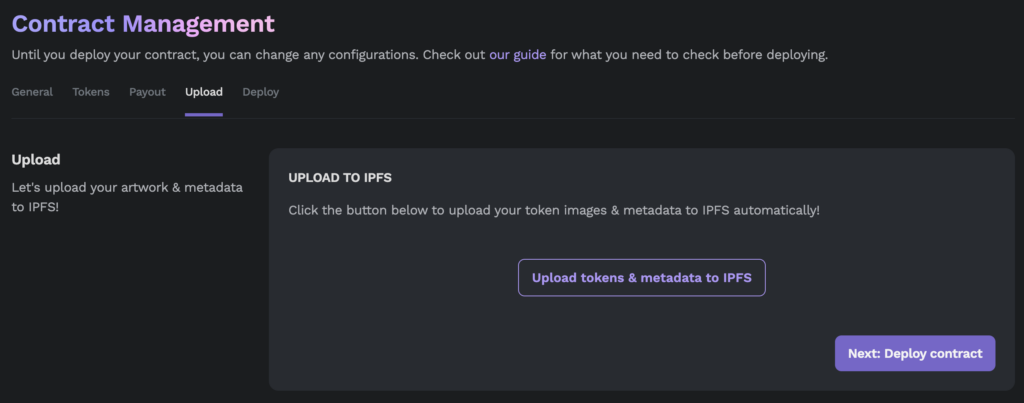
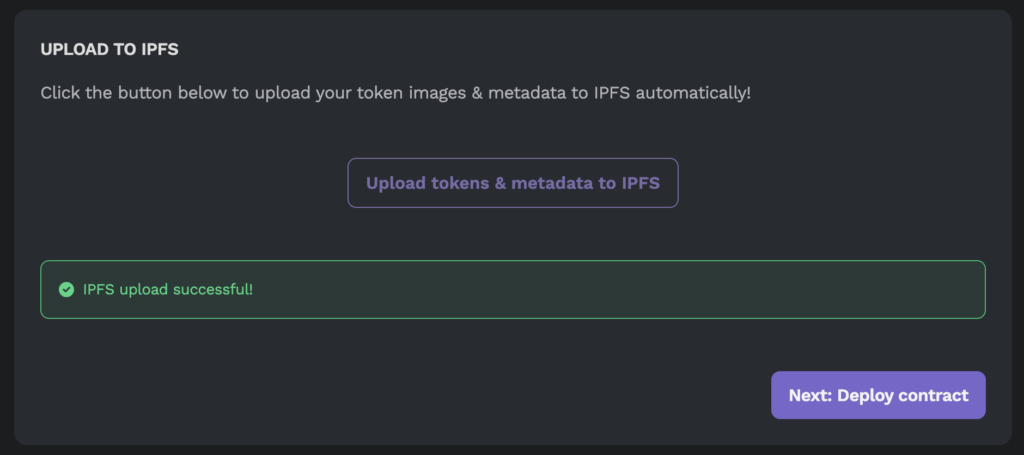
Click the “Upload tokens & metadata to IPFS” button.
You’ll see a bar as it’s in progress; when it’s complete, the bar will turn green.
While you could deploy your smart contract right now by clicking the “Next: deploy contract” button, we recommend double checking everything beforehand, and clicking on General, Tokens, Payout, and Upload to ensure that your settings are correct and properly configured.
If everything still looks good, click “Deploy” on the Contract Management Dashboard or the Go to Deployment button on the banner at the top of the page.
(Note: by default, Launchpad collections are on Ethereum. If you wish to change your blockchain at any time, you can select it at the top of the screen. Doing so will prompt a pop-up, providing you with a list of available networks.)
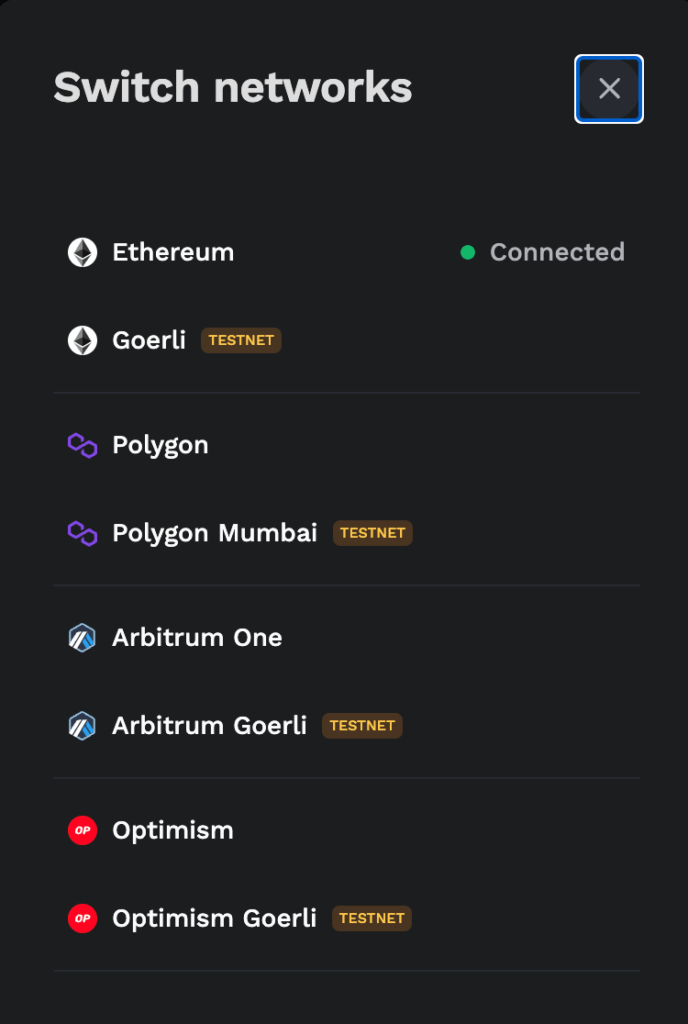
Launchpad currently supports: Ethereum, Polygon, Arbitrum One, and Optimism. It also supports the testnets: Goerli, Polygon Mumbai, Arbitrum Goerli, and Optimism Goerli.
If you’re content to remain on Ethereum Mainnet and happy with your collection details, disregard this and click the “Next” button.
We do recommend you to try the following on testnet first so that you can make sure everything works smoothly when you launch your project on mainnet.
- Start presale/public sale
- Set up mint website or mint embed button and mint one token
- Withdraw funds
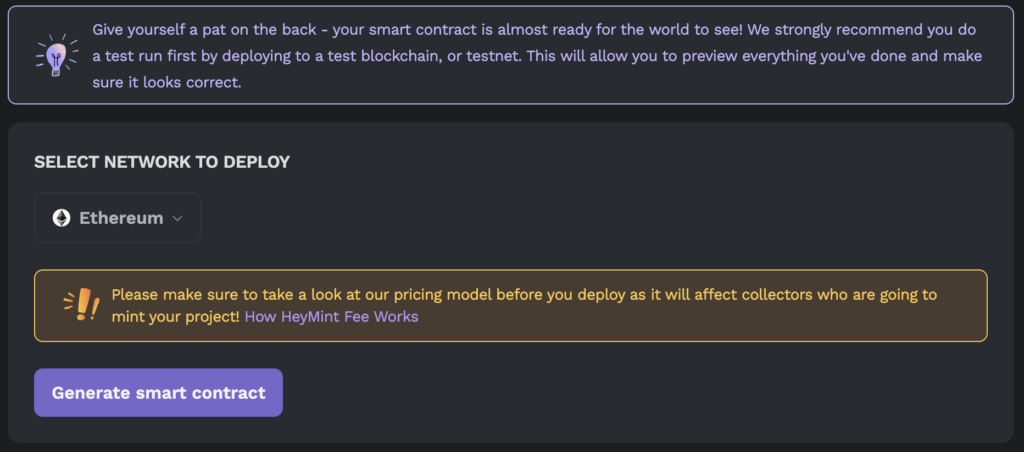
10. Deploy Your Smart Contract (on Testnet)
From here, you can select “Generate smart contract”. As this example collection is being made for Ethereum Mainnet, the appropriate testnet to use would be Goerli, so switch that over. You will also see any relevant warnings or suggestions pertaining to your contract that may require your attention.
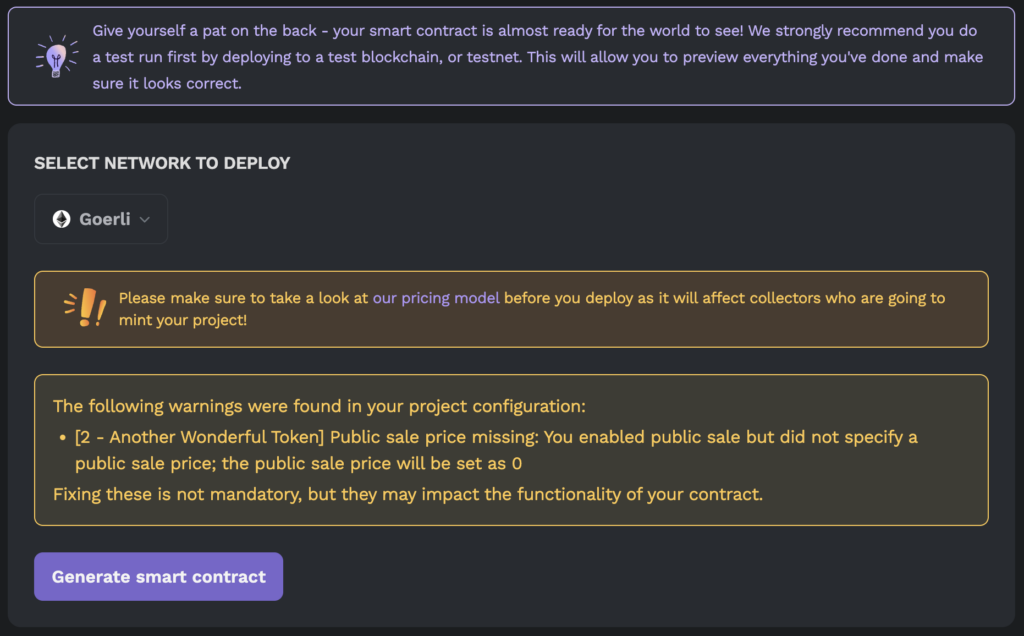
(Note: if you are on Ethereum Mainnet at the time, you will receive a warning and suggestion to try out a testnet deployment first. We cannot stress this enough: testnets are the best way to avoid mistakes in your final deployment.)
Select the “Generate smart contract” button to get started.
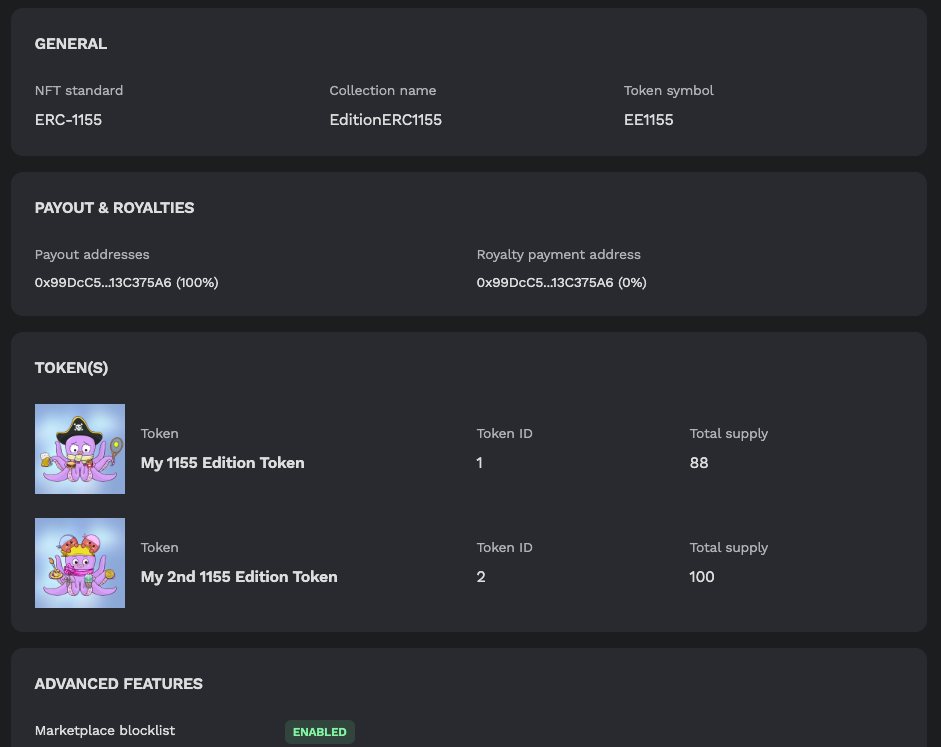
After a few seconds you should see “View Contract Summary” appear below. If you click to expand it, you can preview the general details of your contract.
You can also take a look at the code that will be generated, should you continue.
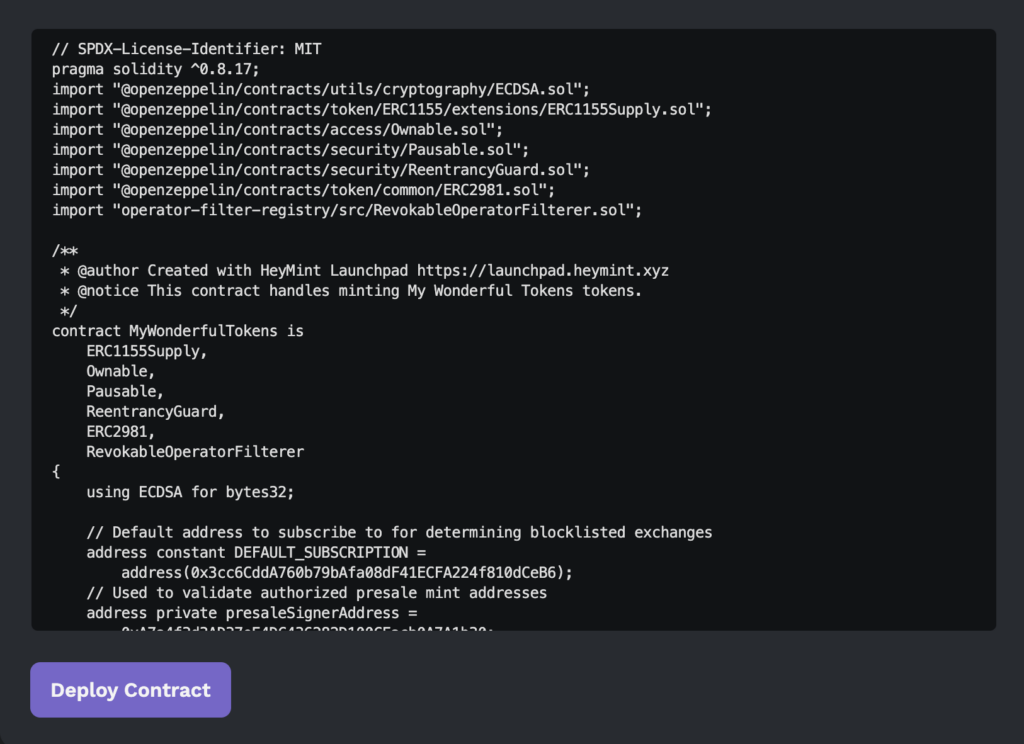
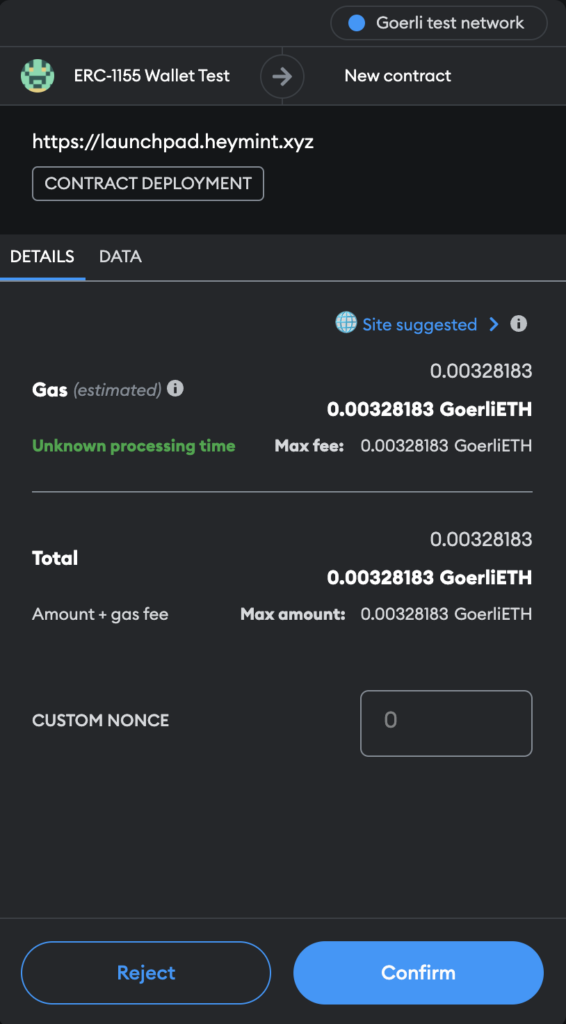
If everything looks good, click that “Deploy Contract” button and let it begin compiling! During the process you will be prompted to sign a signature approving the contract deployment.
If the deployment process is taking a while, you may also be presented with this piece of info:
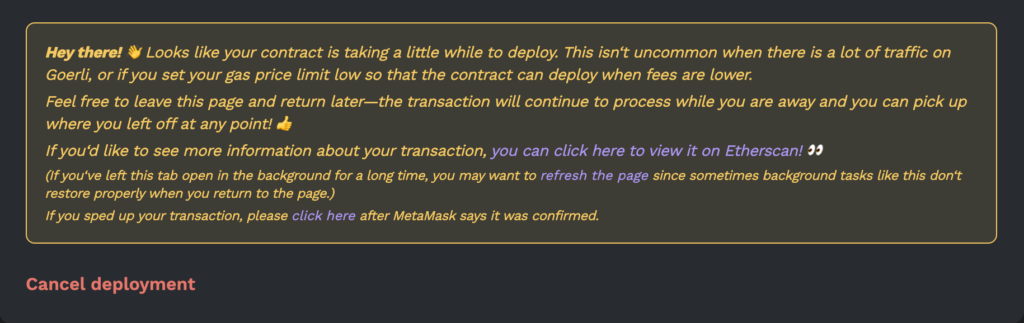
In most cases, this will resolve naturally without further input needed.
When your contract is deployed you will see:
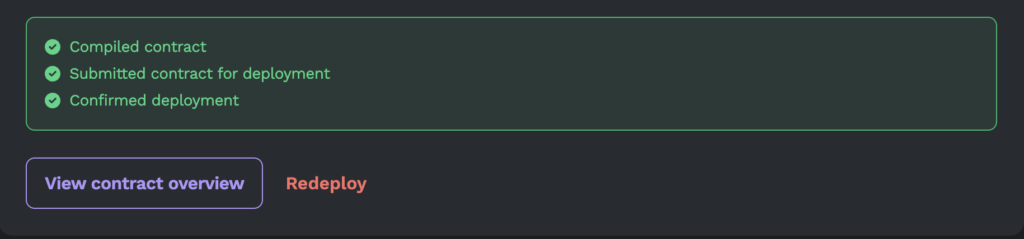
Next, click “View contract overview” to be transported back to the overview page on your Contract Management Dashboard. We suggest selecting “Verify now” next to “Etherscan verification”. It shouldn’t take long to verify your contract.

Once your contract is verified, you’ll see a checkmark next to “Etherscan verification”.

While you could jump straight to mainnet deployment after this, there may be some additional features you wish to test.
11. Import Allowlist Entries
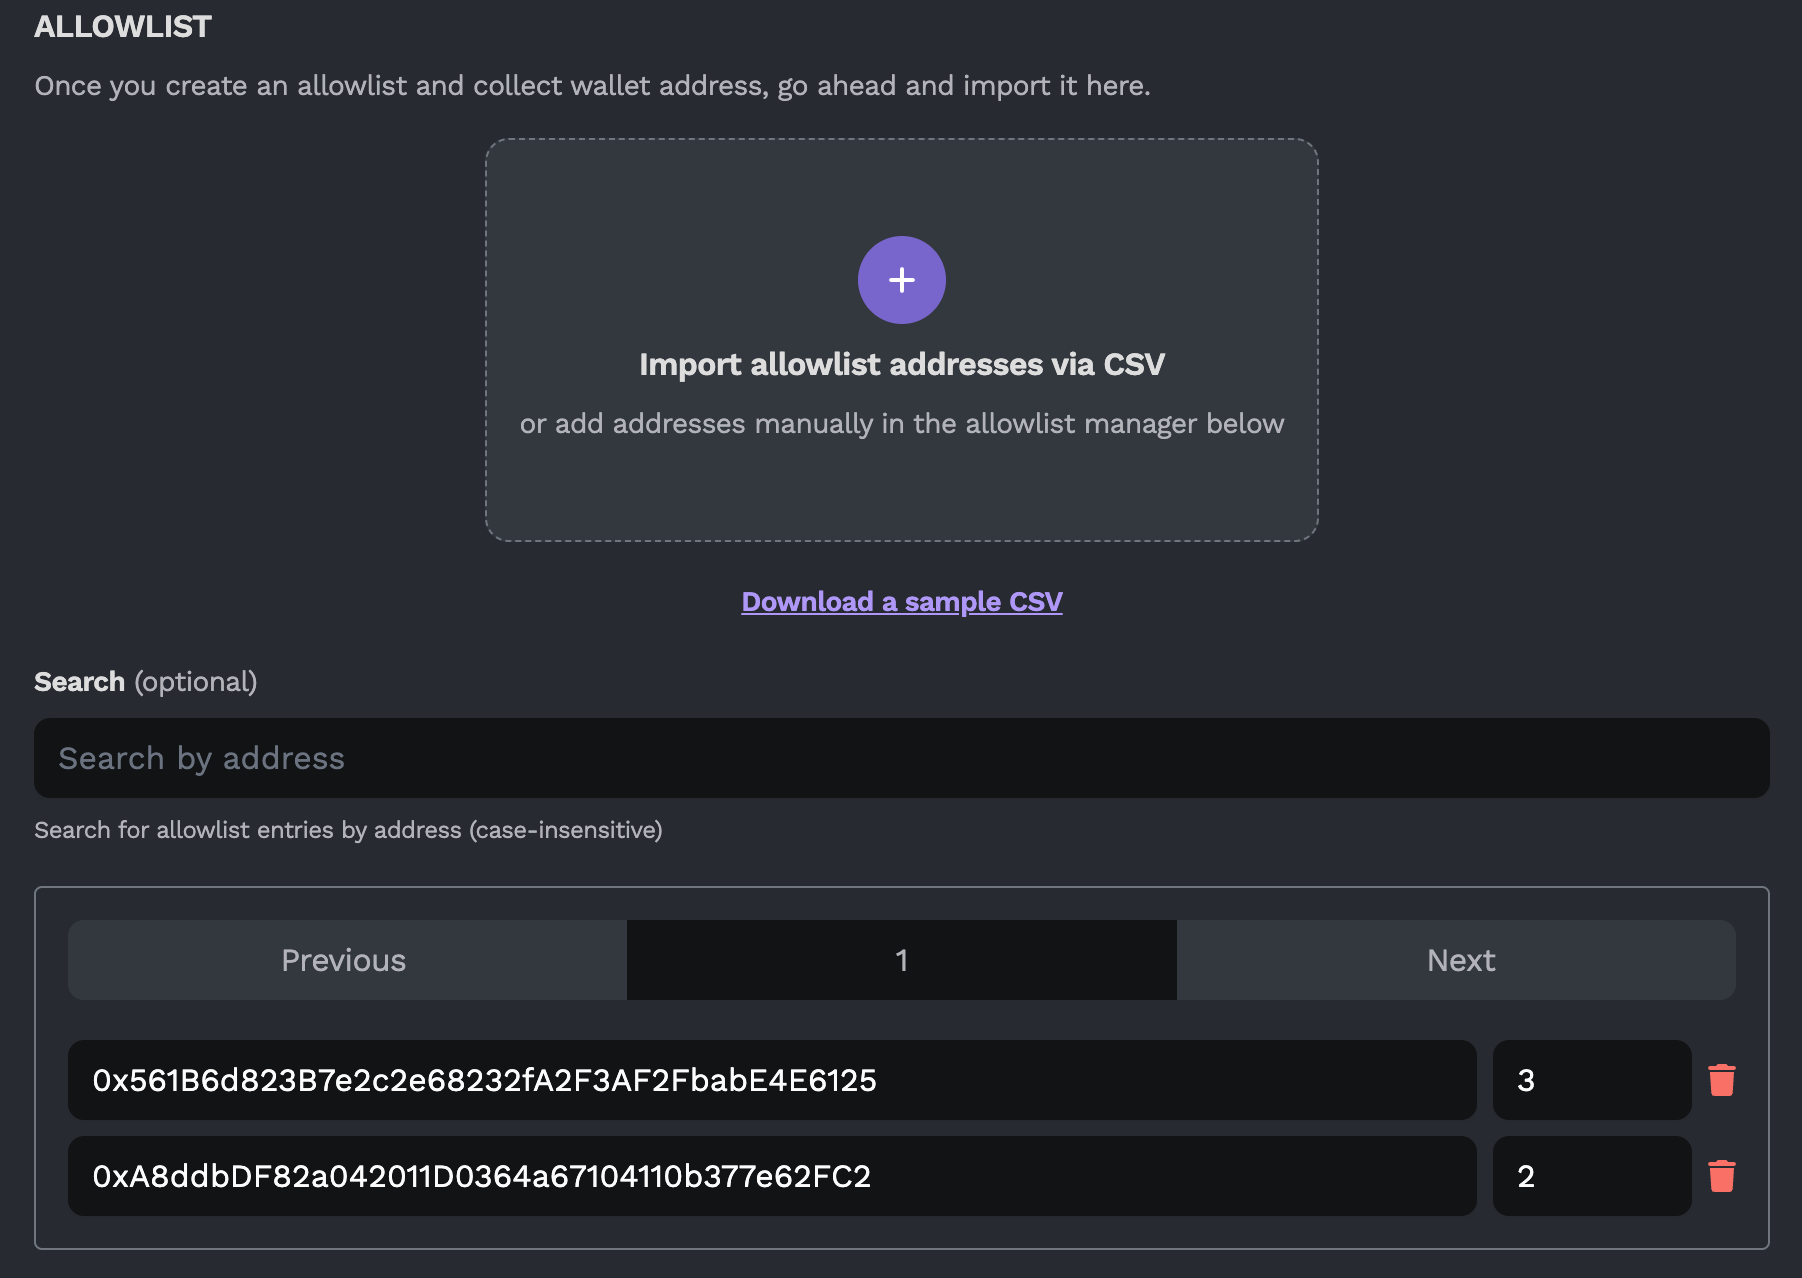
If you intend to have an allowlist, this is a good time to configure that.

From the Contract Management Dashboard, select Tokens, click on the specific token you want to configure and then on the side-panel, click on Sales & Allowlist. On this page you will see a brief overview of your presale status, as well as a section called Allowlist.
From here, you can automatically import a .csv of allowlist addresses you have gathered, or manually add addresses yourself. You may specify the max mint for each address, or set a bulk change (a new quantity to set all your allowlist entries to). If you leave this empty, it will default to your per-wallet limit (if applicable).
When you’ve configured your allowlist to your liking, you may proceed to the next stage.
12. Test Post-Deployment Functions: Mint Page/Embed, Gift & Airdrop.
Build a Minting Page for Your Token(s)
From the Contract Management Dashboard, select “Tokens”. From there, select the token you wish.
From there, select “Minting” on the side panel
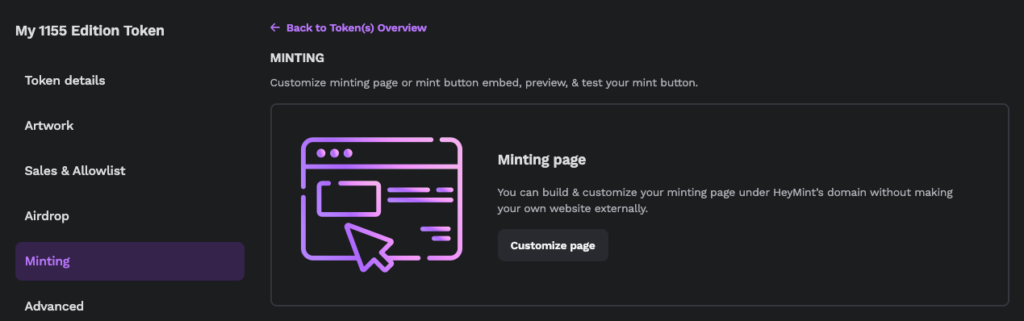
and then click the “Customize page” button under the Minting page banner.
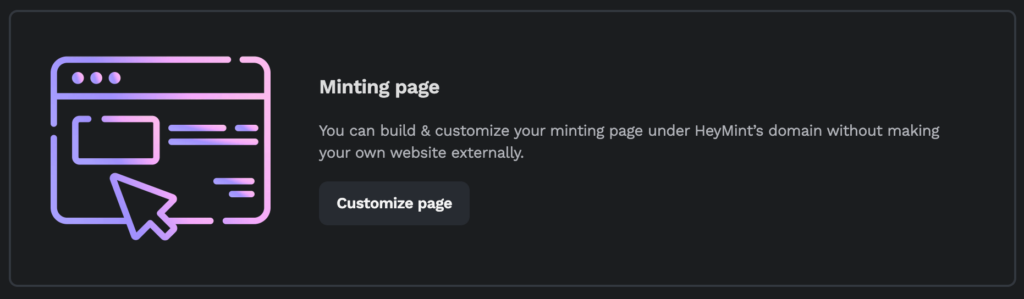
This is a place for you to build and customize a minting page directly within Launchpad and under HeyMint’s domain. This means that you can easily set up and share a page for your followers to mint from, for when you launch your collection and enable sales.

Simply upload an image to serve as an avatar for your collection, set a background image for your mint page, choose a title, and enter a description of your collection to share with your followers. There is also the ability to set a custom url of the mint page to share with your followers, share your start date (optionally), and the ability to link to your website, Twitter, and Discord.
For some extra visibility, ensure that the “Feature on HeyMint” toggle at the bottom of the page is enabled. This will allow for increased discoverability within our platform (if you’re releasing something secretly or privately, you can also choose not to enable this).
(Note: the discoverability feature will only work with mainnet deployments. If you’re on a testnet, it won’t appear in our explore page.)
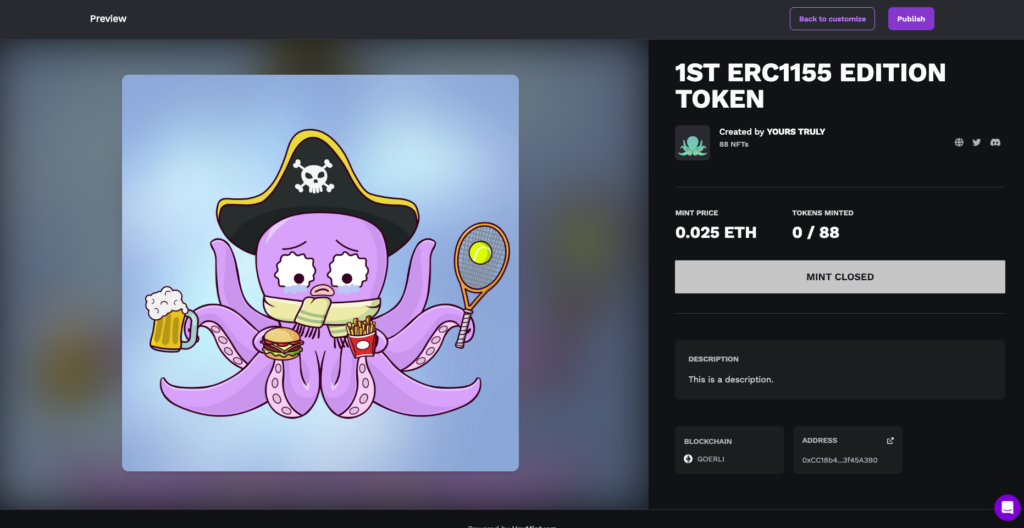
Click “Save changes” when you are good, and select “Preview & publish” to see how your mint page will look before you publish it.
(Note: even after publishing, nobody will be able to mint from your collection until you turn on the presale/public sale. Until then, visitors to your minting page will be met by a “Mint closed” description, as in the photo below.)
If you have multiple tokens, you can repeat the process by selecting a different token from the Contract Management Dashboard and going through the same customization process.
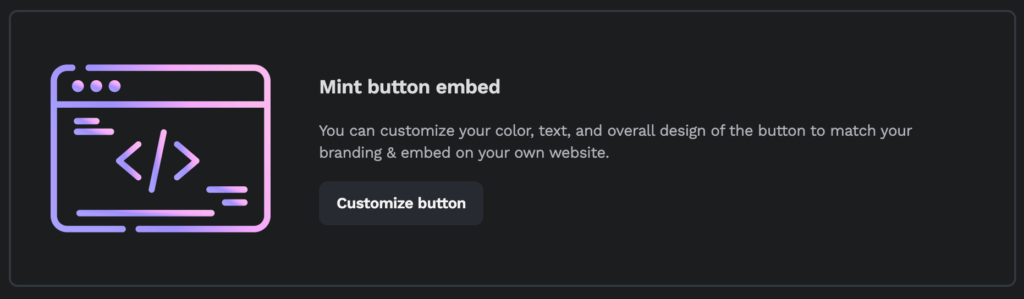
Alternate Path: Build a Mint Button Embed for Your Website
If you prefer, instead of building a minting page within Launchpad, you can make a custom mint button which you can then embed on your website. Once again, from the Contract Management Dashboard, select “Tokens”. From there, select the token you wish.
From there, select “Minting” on the side panel and click the “Customize page” button.
from the Contract Management Dashboard, select “Minting”. From there, select the “Mint button embed” button instead.
Fully customize your button including its background color, text color, font, radius, and label (the text that appears on the button). You can reference this color chart when selecting background/text color codes.
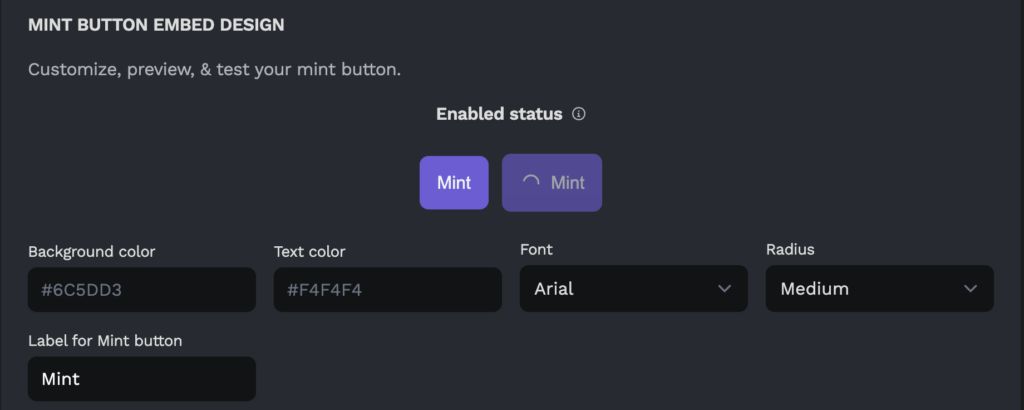
As you will see, you can set a custom look for both the enabled and disabled status of your mint button embed. This is useful to let your visitors know the current status of your mint
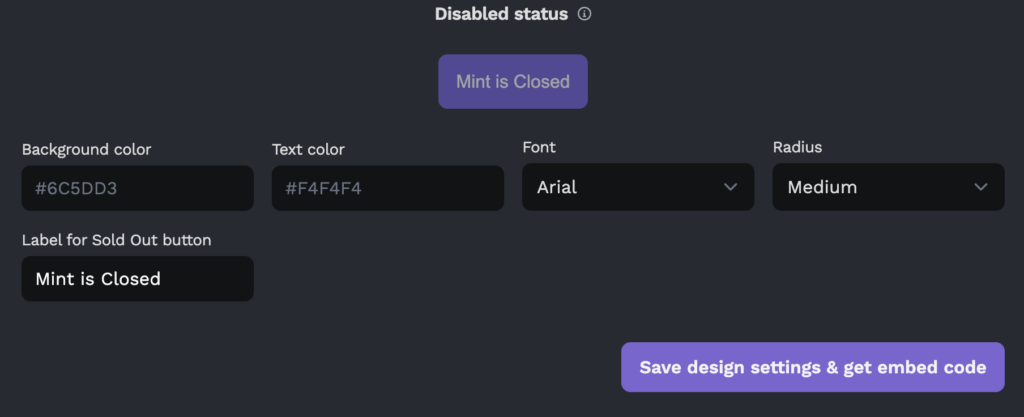
When your enabled and disabled mint button embeds are configured to your liking, select “Save design settings & get embed code”.
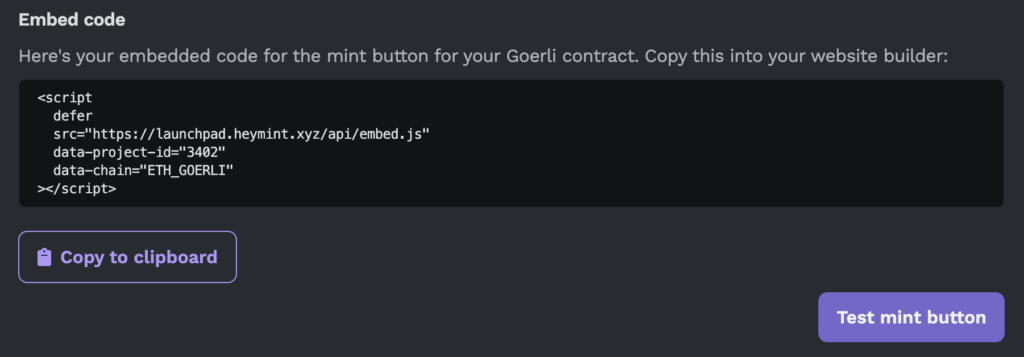
Click “Copy to clipboard” to copy your mint button embed design and information, which you can then import and paste into your website builder. There is also a “Test mint button” should you wish to once again check how your mint button will appear to visitors.
13. Import Gift/Airdrop Addresses
From the Tokens page on your Contract Management Dashboard, select your chosen token. Then, choose “Airdrop” on the side panel which appears.
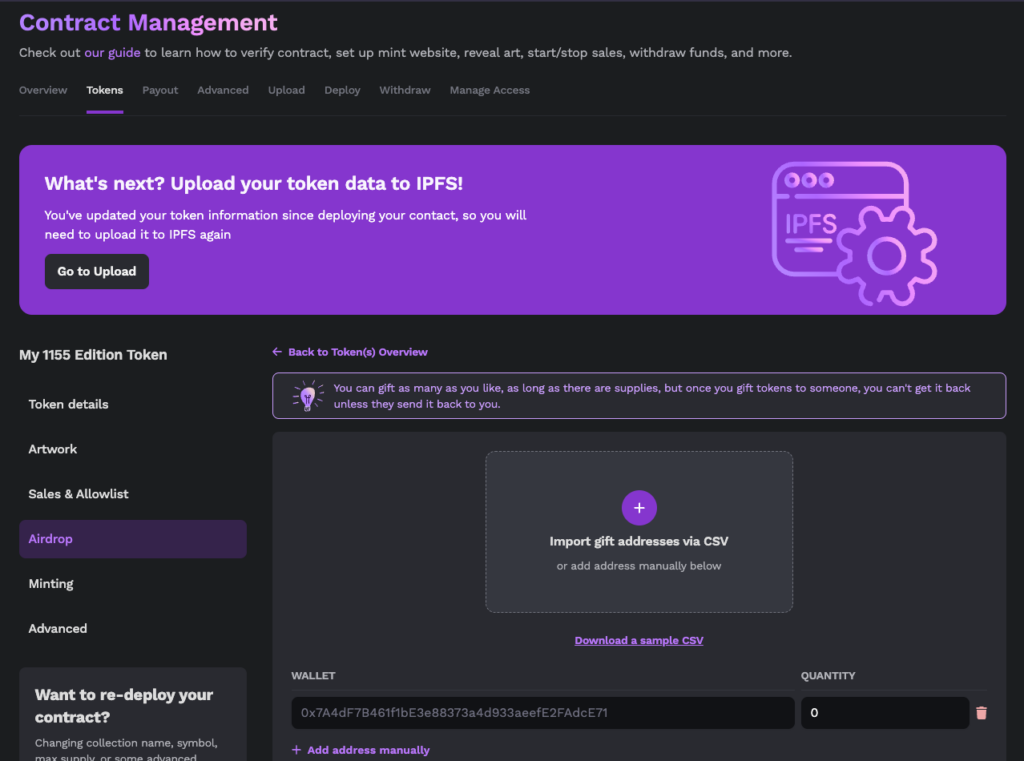
From the Airdrop page, you can automatically import entries for your collection via .csv Alternatively, you may add addresses manually. In either case, make sure to specify the quantity of gifts/airdrops any given address will receive from your collection.
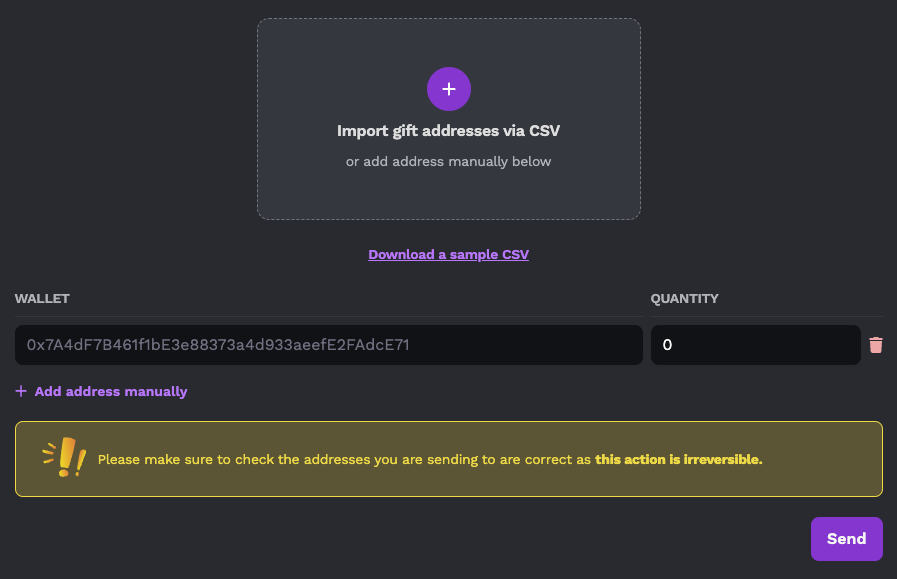
When you’re all set, click “Send”. Please be advised that this action is irreversible: there is no undo button for tokens that have already been sent.
If you’re happy with your mint page or mint button embed, and have tested gifting/airdrops, then there’s nothing more to do here. You’ve officially tested all that you can. Hooray!
14. Deploy Your Smart Contract (on Mainnet)
So you’ve thoroughly tested your collection on testnet and have ensured that everything is working properly. Wonderful! Now it’s time to deploy your contract for real! Once again, as deploying on Ethereum Mainnet will cost actual ETH, not testnet ETH, make sure that you’ve configured your collection to your heart’s content. While some settings can be adjusted after deployment, many things cannot be changed without a gas charge, and a few things cannot be changed at all.
If you have any doubt as to whether things are configured properly or not, return to testnet testing.
But if you are all set, you may now deploy your collection by clicking “Generate smart contract”, this time on your intended blockchain (we used Ethereum Mainnet for the purpose of this walkthrough). You will incur a charge when deploying your smart contract: this fee is not paid to us; it is simply the cost of deploying something onto the blockchain.
Once deployed, you can set up and share your mint page for real, begin gifting/airdropping NFTs if you so wish, open or close your presale/public sale, and more.
15. How to Withdraw Your Funds
After your contract has been successfully deployed, you will have access to the withdraw function for your collection. To withdraw your funds at any time, select withdraw from the Contract Management Dashboard.

From here, you will see a quick overview of your token(s) and their balance accrued thus far.
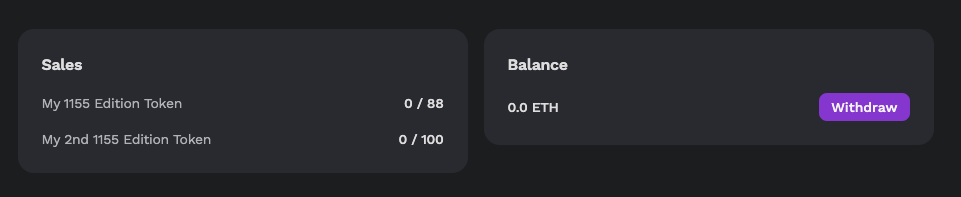
After clicking the withdraw button, you will once again see the the amount of revenue your token(s) have earned, as well as the wallet address tied to the account. If you’re ready, select “Withdraw Funds”.
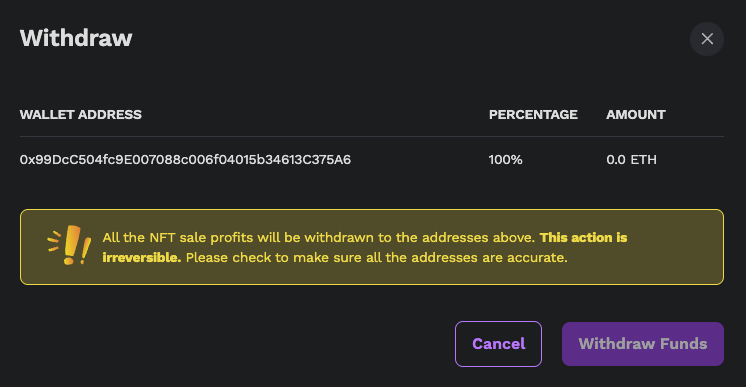
(Note: you will be prompted to pay a small gas charge in order to process your transaction. Doing so will withdraw your total available balance to your designated wallet. This action is irreversible, so please make sure that you have verified your address before withdrawing)
And that’s it! I know we went rather in-depth, so if you’re still here, thank you for sticking with us 💜

If you have any questions about using Launchpad, please share them with our team by connecting with us via the HeyMint chat widget on our website.
And as always, thank you for using HeyMint 🍬